
Engaging with followers and friends on social media has become an ever-changing activity. From text posts, to links, images, and now videos, all types of media can be used to create these interactions and to get your followers the information you’re sharing. In the last few years, video content on social media has become all the rage, with video marketing pieces performing up to 50% better than other multimedia posts on most platforms. According to WordStream, “45% of people watch more than an hour of Facebook or YouTube videos a week.” Your followers want to be able to engage with you and your brand, and video marketing adds a face, and possibly a personality to your content, further driving engagement. After all, people like to interact with people, and what better way than to see the person or people behind the brand doing something through video. Static videos aren’t the only source of video content to use on social media, with an increasing number of people and brands leveraging live video, such as streaming on Twitch, YouTube, or using Facebook Live.
Setting yourself up to take advantage of these livestreaming platforms is super easy, with a horde of open-source and free software available to get you started. One thing to note before we dive into this topic is that streaming to Facebook Live through your PC requires a decent internet connection, and enough processing power to encode and send the video stream to the Facebook endpoint, so the laptop that’s been in your closet for eight years probably won’t cut it. Using other applications while you’re livestreaming can hinder the performance as well, but your experience will ultimately depend on the hardware you have access to.
There are a few core steps to getting ready to stream to Facebook Live, including:
- 1) Obtaining Facebook Access Token
- 2) Downloading Streaming Software (OBS)
- 3) Configuring Your Streaming Software
- 4) Go Live!
- 5) Additional Notes on OBS
Obtaining a Facebook Access Token
The first step to using Facebook Live, to engage with your friends and followers, is to obtain the access token from Facebook. This allows you to get access to the Facebook API that will be receiving and serving the live video on the feed of your choosing. The Facebook Help Center has a relatively straightforward tutorial for this, but I’ll try to break it down here as well. The first step is to visit the Facebook Live Creation page and log into Facebook on the account you would like to stream to (if you are trying to stream to a page, you must log into an account that has administrator access to the page). Once you’re logged in, you’ll need to click on the “Create Live Stream” button at the top of the page. This will open a new interface for you to verify settings, choose the page/profile you’d like to stream to, and obtain your access key. Facebook has made livestreaming easier than ever with this new interface, and the new feature to allow users to create “persistent stream keys,” or keys that won’t expire and can be used across multiple livestreaming occasions.
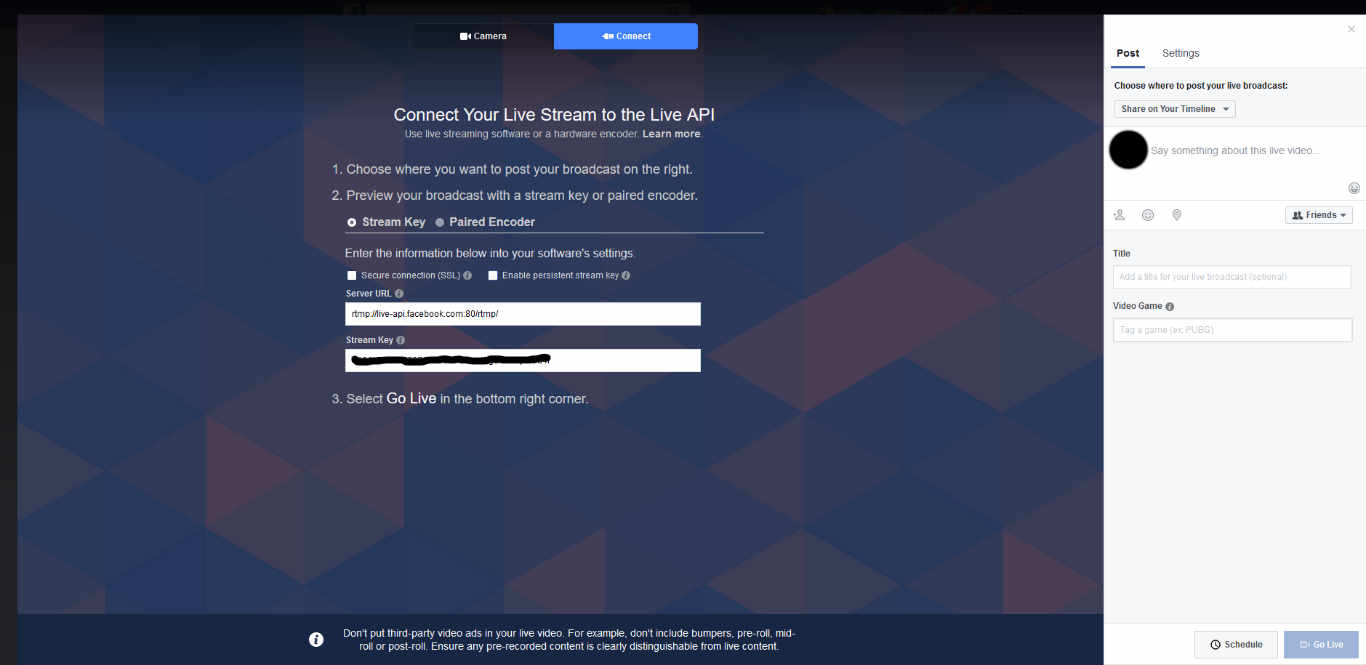 The new, easy to use interface for Facebook Live Integration.
Inside of this new interface, you’ll be able to add a Title to your stream, as well as tag it to a video game (if you’re livestreaming yourself playing video games). You can also set the privacy settings like you would on a normal Facebook post, choosing who to show the post to, anyone to tag in it, the ability to set your location, and you can even set a message to accompany your video stream. After setting these, and choosing which page you’d like to stream to, verify that you’ve checked the “Enable persistent stream key” checkbox so your key doesn’t expire (and you won’t need to do this step again for that page). In the second input field, you should see your newly generated Stream Key—copy that to a safe place, and you’ve completed the first step! Make sure to keep that Facebook window open, as it will be where we see if our stream is connecting properly.
Downloading Your Streaming Software (Open Broadcaster Software)
There are tons of software out there for livestreaming, each with its own features and downfalls. On top of there being a ton of software, there are tons of free, open-source software to accomplish this, so you won’t need to break the bank when finding the right way to start your livestreams. We recommend Open Broadcaster Software (OBS) for this task, as it’s easy to use, allows for a fair amount of customization when it comes to settings, encoding, and recording your video, and doesn’t come with a ton of overly complicated features, so setup is a breeze. Downloading OBS is simple, just visit The OBS Website and download the software based on your operating system (Windows, Mac, and Linux are all supported). Once you’ve downloaded and installed OBS, you’ll be greeted with a popup asking if you’d like to use the Auto-Configuration Wizard for the initial setup. We recommend using the wizard, unless you’re familiar with the video encoding settings, and can confidently tweak those settings for yourself. The first step is to tell OBS you need it to be optimized for streaming, then you choose your Canvas resolution and FPS (Canvas is your base resolution, not what your output is), and your FPS should probably be set to “Either 60 or 30, but prefer 60 when possible.” This will ensure that you are getting at least 30 FPS, which is the base-level standard for video output of this variety.
The next window will allow you to connect your stream to Facebook Live. From the “Service” dropdown, choose Facebook Live. Now, take the stream key you copied to a safe place in Step 1 and paste it into the “Stream Key” field. Once you’ve pasted the stream key, click to continue, and OBS will attempt to connect to Facebook Live and check your bandwidth, so it can set the optimal output settings for your device. Open that Facebook window up again, and you should see a change in screen, and it should tell you that it’s, “Fetching Video Stream…” This means you’ve made a successful connection. You should only see static once the stream is properly fetched, but that’s a good sign. You’re now successfully connected to the Facebook API, all we need to do is configure OBS and click the “Go Live” button on the Facebook page (which you should still keep open).
Configuring OBS For Your Stream
Returning to OBS, you should now see the main dashboard. The large viewport at the top is for seeing the output of your stream, which should be a black box currently. Across the bottom, there are several functions. Scenes are different sets of sources (inputs), which you can configure individually for different projects (say, livestreaming a video game versus livestreaming you ranting about something), so you don’t have unnecessary inputs or a ton of overhead if it’s not required. The first step is to create your scene using the “+” button inside the “Scenes” box and name it something meaningful so you don’t need to sift through scenes to figure out which you’re using.
 Creating a Scene in OBS to apply input sources to for livestreaming.
Once you’ve created your scene, it’s time to create your input sources. These sources can range from a window capture (something like showing off your web browser) to a video capture device (a webcam or video camera), or even a color source (just a shape of color). The core sources for any livestream are going to be a video capture device, and a window/game capture. We recommend spending some time familiarizing yourself with the different sources, as there are a lot of engaging and fun things you can do with your stream once you’re more familiar.
Start by clicking the “+” button inside of the “Sources” box and selecting “Video Capture Device.” This will bring up a prompt for you to either “Create New” or “Add Existing.” Once you create a source, you can import it into any scene of your choosing, making setup for multiple scenes even easier. Name the source something memorable, make sure “Create New” is selected, and click “OK.” Another window will open, allowing you to configure the properties of that device on that source. Make sure the correct device is selected from the “Device” dropdown. If it is, and it is connected to your device, you should see a preview of the output in the box at the top of this window. Make sure the rest of the settings for that device are configured to your liking and click “OK.” You should now see your new source in the “Sources” box at the bottom of your OBS, and the source should be within the scene at the top of your OBS client. From here, you can choose how to position that source. Click on the source at the bottom of OBS to select it, and you should see a red outline with draggable handles around that source within your scene. Use those handles to resize and position the input to your liking, and then click the lock icon on the source to lock it into place.
 Creating a Video Capture Source is a simple as naming it and following the instructions.
When adding multiple sources to a scene, be aware that the order that they are in in the “Sources” box is the order of their depth as well. The first source is always on top, and as you go down the list each is a new layer behind the ones above it. Make sure your sources are in the correct order, and you’ve resized them to fit your window appropriately. Once your proscenium at the top of OBS looks like you would like it to, and your sources are cooperating, you’ve finished your configuration of the OBS client, and we only have one more step!
Going Live!
You’ve made it to the best part—getting yourself live on the internet for your friends, family, and followers to see. At the bottom-right side of OBS, you should see a “Start Streaming” button. You’ll click on that to start the output to Facebook Live. Open the Facebook window back up for the last time, and in roughly the same position you will see a “Go Live” button—click that, and your livestream has started. Remember to engage your audience and have a good time doing what you do. According to Tubular Insights, viewers spend on average 8X longer watching live video that on-demand—so use your new livestreaming ability to your brand’s advantage and get the word out there, create a community, and see the results for yourself.
Additional Notes about OBS
If you’ve made it this far in the post, and you’re still reading, this section is for some of the more advanced, or finicky settings within Open Broadcaster Software. These settings range from audio input device management to using specific source types. Starting with audio input devices, OBS should automatically recognize them in the third section labeled “Mixer.” If your audio device isn’t there, there could be an operating system-specific issue with drivers or setup. We can navigate around troubleshooting your device through your operating system by simply adding a new source for “Audio Input Capturing” and selecting the device there. This could be the case if your camera (which we created a “Video Capture Device” source for earlier) is also your audio device. Simply select the proper source, and tell it your camera is also the audio device, and it should appear in the “Mixer” on OBS, for you to modify the settings and capture the perfect audio for your project.
For those of you who are using OBS a little more extensively, it also offers many transition libraries to make it easy to make transitions between scenes look nice and flow. Say you’re livestreaming a video game, and you decide it’s time to switch to having a conversation with your audience; having a scene set up that’s just your camera and audio device to get a more personal touch to your stream might be great, but if you have no transition between, and it just jumps from having a game in the background to only being your face, up close and personal with your audience it will look choppy and could turn some people away. OBS also offers a Studio Mode, allowing you to preview transitions and other effects applied to your stream with a dual-display setup.
The takeaway from this section is simply that with a little effort, and some digging around, OBS will do a lot of the heavy lifting for you and will allow for you to produce clean, quality livestreams. Being open-source (read: free) makes the decision to use OBS even easier, and with the pre-built configurations for all of the popular streaming services, you can go from nothing to livestreaming in around 5 minutes.
Even if you don’t want to put in the additional effort to customize your stream, using OBS makes the entire process easy and allows for any level of customization that will fit your brand, page, or yourself. Is livestreaming something you’re interested in? Do you need a new custom build to facilitate your streaming? Or just some help getting everything configured correctly? Let us know today, and one of our qualified technicians will reach out to you to get your new video content live quickly and easily for you!